Monday, January 25, 2010

Self Portrait

Moving on to our second semester our first weekly project to coincide with our 'People - The Human Condition' brief is to take a self-portrait. Very apprehensive at this stage in regards to taking photographs of myself as I prefer to be behind the camera (especially in case I break the lens . . . ha ha) however joking aside I do appreciate that understanding how I feel in front of my own camera will enlighten me of the fears that my future sitters may have!

To think beforehand our self portrait should be influenced around the writing of Susan Sontag, quotes taken from her book (Sontag.S.1979,'On Photography'. Penguin, London.

"A photograph is both a pseudo-presence and a token of absence. Like a wood fire in a room, photographs - especially those of people, of distant landscapes and faraway cities, of the vanished past - are incitements to reverie. The sense of the unattainable that can be evoked by photographs feeds directly into the erotic feelings of those for whom desirability is enhanced by distance. The lover's photograph hidden in a married woman's wallet, the poster photograph of a rock star tacked up over an adolescents bed, the campaign-button image of a politician's face pinned on a voter's coat, the snapshots of a cabin-driver's children clipped to the visor - all such talismanic uses of photographs express a feeling both sentimental and implicitly magical:they are attempts to contact or lay claim to another reality."


This is the photograph I presented for our weekly brief critique. No post production treatment was used apart from a little cropping to frame my photograph.

I decided to take a personal glimpse into my life with my daughter Shannon. A usual awakening to my alarm clock to find that she has sneaked into my bed during the night. I used a fast shutter speed to portray the madness in my life and the stillness of my daughter sleeping to capture how as a mother her contentment will always be my first priority.

Wednesday, January 13, 2010

Digital Darkroom - Organising & Manipulating Digital Images

Since starting the FD course advice has been given to use appropriate software to import our digital images. A leading digital asset management is Adobe Photoshop's Lightroom 2.0 and below I have added screen prints to demonstrate my knowledge and understanding on how to import, organise and name my images within the program.

The 1st screen to appear when your importing your images into Lightroom is the one below;

Firstly you need to select how you require your photographs to be organised, this can be done by giving a name to the folder with or without the date of the import. It is not essential to name your folders, i.e just have a date to show when the photographs where imported, however it is advisable to use for convenience sake due to it then being easier for you to locate certain categorized photographs. You are also able to re-name the file name of the batch of images you are importing. This can be done by clicking on the template drop down and choosing the appropriate format you wish your file's to be recognised as, rather than just appearing as a number! After your imports are complete you should then be able to view all your images in the Library as shown below.


Once your folder has been created and all your images have been uploaded to the program you can click on any individual photograph and under the heading at the right hand side of the screen 'Metadata' you are able to give titles and captions to individual photographs. I titled the above as 'Product Shot' and captioned it as 'No7'

To be able to manipulate your images, after selecting the image you wish to work on, you must click on 'Develop' which can be found at the top right hand side of the page as highlighted below. Within the right hand column below within the 'Treatment' area you are able to change whether you require your image in colour or as a black and white photograph (grey scale). Also you can change the white balance on your colour photographs by decreasing or increasing the temp slider.


This is my original colour photograph

This is a black and white version or grey scale of my original photograph

This is a 'cooler' colour temperature version of my original photograph

This is a 'warmer' colour temperature version of my original photograph

Tuesday, January 12, 2010

Macro - Different types of Light Sources at home

Macro lenses allow you to magnify and focus closely to your subjects. As yet I don't own a changeable macro lens however my canon D50 was purchased with a Macro (0.5m/1.6ft) Telephoto-Zoom Lens 28mm-135mm. The only downfall I would say is that the largest aperture available is only F3.5 where on macro only lenses they can be as large as F1.4, therefore giving you more creative play!


Below are some shots I took of some plants using ambient lighting via a window. As I was using natural light I set my camera to shoot with auto white balance to show the true colours of the leaves and plant stem. I took a variety of shots, not all fully macro, to show differences in depth of field.


The Cactus above was one of my favourite shots, again shot via window lighting

I then decided to photograph the same Cactus with the use of artificial lighting. Firstly with Halogen / tungsten, I used a work lamp and placed it at a 45/45 degree angle.

As you can see shooting with an automatic white balance with the use of halogen/tungsten lighting, gives a yellowish colour to your final image, however below shooting with the use of a Tungsten colour balance it corrects the final image to give a more natural look with no yellowish glow!

I then photographed the cactus using an incandescent light source. I used a table lamp which was fitted with an energy saving light bulb and positioned it at the same 45/45 degree as I did when a photographed the cactus using the work lamp.

Again as seen from shooting with an automatic white balance, incandescent lighting gives a similar yellowish glow as did when shooting with the use of halogen/tungsten. The below was photographed with the use of tungsten colour balance which again gave a more natural look to the final image.


Lastly I shot the same cactus with the use of fluorescent lighting. I placed the cactus in the middle of the kitchen, obviously not being able to experiment too much as the lighting is fixed to the kitchen ceiling however again it seems that the majority of artificial lighting gives a yellowish glow to your final images unless colour balance corrected!

Group Task - 'From capture to print'

On 25th November 2009 our course leader, John Harrison, set all the year 1 FD Photographic Media students with a group task.

The Task being; Working in a group of no more than 4 people, produce one final photograph influenced by one of the following film titles:
  • Breakfast at Tiffany's
  • The Fountain
  • Into the Wild
  • Dead Man's Shoes
  • Dog Day Afternoon
  • A Clockwork Orange
  • Sunset Boulevard
  • Three Colours Red
  • Stand By Me
  • The Thin Red Line
  • Rear Window
Firstly our group decided to research on the internet, especially as the majority of us had never seen or even heard of these old school films lol
I came across a film still photograph within the film 'Dead Man's Shoes' and due to one of my group members being fascinated by horror photography and her knowing many people who would willingly model for our shoot we decided to pursue with reinventing the film still image.


We headed out to an abandoned warehouse, after picking up all the necessary props we needed to reinvent the scene and our model met us there. After covering him in fake blood and placing him in the necessary position to the bottom right hand side of the frame we took our photographs.
Back at university we choose between the images we had collated from all four of us and darkened the final image slightly using the program 'photoshop'. The only difference I'd say was that our photograph was shot with the use of ambient lighting and the original film still with artificial lighting!


All the groups final images where delivered via email in a 300dpi.jpg file to Kevin, the photography departments technician. All the images where then printed and ready for a 1st group critique session by 3pm that day!

Thursday, January 7, 2010

Location Photography - Different types of light sources

As part of our systems and processes brief we are required to take pictures of objects lit by different light sources: natural ambient light, fluorescent, incandescent, sodium, strobe and halogen/tungsten.

As I have already taken the photographs in regards to showing the differences in photographing with the use of fluorescent, incandescent and halogen/tungsten lighting (see post titled "Macro - Different types of light sources at home") below are my photographs taken of objects lit by the following three types of light sources spotted whilst out and about with my camera: strobe light, sodium light (street light) and magic hour lighting!

Strobe Lights

Although it is not possible to show the true effect of strobe lighting via a still photographic image as strobe lights continuously flash in a sequence, it is possible to use a long shutter speed to capture the light they produce.
Whilst shopping in my local town I came across this strobe lit sign in a shop window. Firstly I used a fast shutter speed to capture the movement, sequence of lights within the image then I took the same photograph with a slower shutter speed to capture the full effect of the LED lighting.

ISO 800, F22 @ 1/13 sec

ISO 800, F22 @ 1 second

Sodium / Street Lights

Whilst visiting Hartlepool to watch my daughter compete in a dancing contest as night had fallen, I noticed across from the dancing hall the beauty in which the street lights lit the scenes tranquil surroundings.
As you can see from both of my original photographs the artificial street lights give a warm yellowish glow although I feel that they give an atmospheric look to the overall image.
ISO 2000, F4.5 @ 1/4 sec

ISO 2000, F3.5 @ 1/15 sec

Magic Hour Lighting

The term 'magic hour' lighting is referring to the first and last hour of each days natural ambient light. At this time the lighting is very soft and forms beautiful shadows against the sitter or objects your intending to photograph.
Whilst walking with my daughter one Sunday afternoon I noticed an abandoned shed where the light had fallen nicely upon the side casting shadows of the trees surrounding it.

ISO 400, F3.5 @ 1/400 sec

Camera / Lens Technique

To be a confident photographer you must firstly understand the basics in operating your camera. A Digital Single Lens Reflex camera (DSLR) is basically a box with a small aperture at one end and a image sensor at the other. A device called a shutter opens when the camera is being used to take a picture. Unfortunately unlike the old school 35mm SLR camera the DSLR sensor is not as big as the 35mm film plane therefore the below differences have to be taken into consideration when using different lenses for example;

Wide Angle (180 degree) Standard (45 degree) Telephoto

DSLR 17mm 28mm 50mm
SLR 35mm 28mm 50mm 85mm
FFDSLR 28mm 50mm 85mm
Unless using a more expensive Full Frame Digital Single Lens Reflex Camera (FFDSLR)

Being the poor student that I am 'but happy', I decided to purchase a Canon 50D which is NOT a FFDSLR

There are five principle steps in the digital photographic process;
1. Capturing the rays of light (Setting the correct aperture and shutter speed advised by the internal light meter reading or with the use of an external light meter)
2. Focussing the image (With the camera lens)
3. Exposing the sensor (Releasing the shutter)
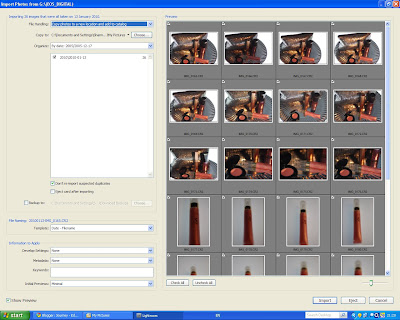
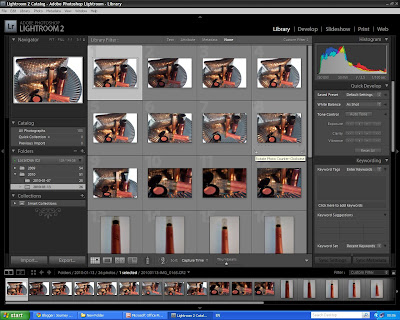
4. Uploading the images onto a computer via a program such as Lightroom or Aperture
5. Printing your photographs with high quality printing paper

Please refer to the below website which gives clear instructions on how to take digital photographs

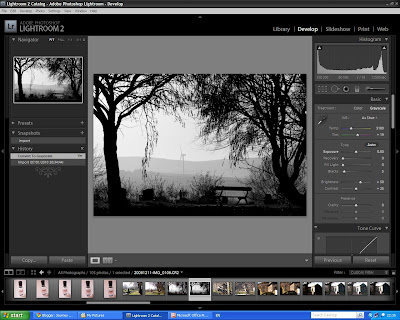
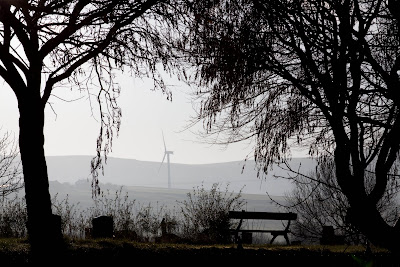
After our 2010 New Year began the 'pillows above were again shook by the almighty' and covered the majority of the North of England with a bed of snow to which I popped out to take some Winter landscape photographs. The below photographs where taken at a local park in Accrington, situated at the bottom of one of Accrinton's landmarks the 'Coppice'.

ISO 100, Focal length 38mm, F11 @ 1/100

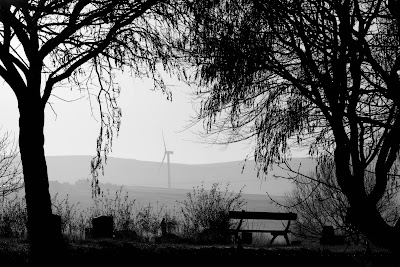
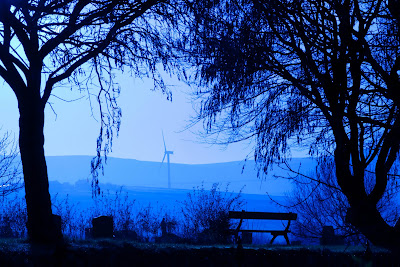
ISO 100, Focal length 35mm, F6.3 @ 1/100


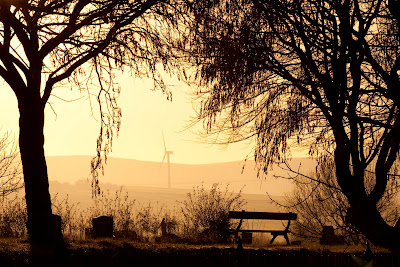
As you can see from my photographs above, I have taken the same shot twice but using a different aperture for each. My internal light meter suggested that I use an aperture of F11 with a 1/100 second shutter speed however when photographing in the snow it is recommended to open the aperture by 1 to 2 stops to capture the correct scene viewed by the human eye, as suggested on this informative website that,

"A correctly exposed photograph in theory is to simulate what the human eye would perceive the light levels to be. An overexposed shot is too light; an underexposed shot is too dark."
http://www.betterphotoschool.com/lightexposure/item/7-understand-aperture-photography-fundamentals

The aperture is measured in F-Stops which determines the size of the hole. The lower the F-Stop number, e.g F2.8 the greater the amount of light is allowed to pass through the lens to fall upon the image sensor.

Using a LARGE Aperture ( LOW F-Stop Number) - Use in low light levels / Use for shallow depth of field / Use to freeze movement (will require a fast shutter speed)

Using a SMALL Aperture ( HIGH F-Stop Number) - Use in high light levels / Use for deeper depth of field / Use to capture movement (will require a slow shutter speed)

Depth Of Field

In a photographic image the depth of 'sharp' subject defines the term 'depth of field'. Depth of field is controlled by three factors;

  1. The size of the aperture
  2. The focal length of the lens
  3. The distance from the lens to the subject


Below are some photographs which I took to show 'shallow depth of field'. To do this I used the largest aperture available on my lens, which was F5 and got very close to my subject ensuring I was still in focus.
If I was to obtain the peak shallow depth of field I should have used a bigger focal length however I decided to use the one's advised below which I felt made my photographs look more successful!

ISO 200, Focal length 38mm, F5 @ 1/125

ISO 200, Focal length 47mm, F9 @ 1/125

So in essence to achieve a very shallow depth of field; Use the largest aperture available, the longest focal length of lens available and get very close to your subject but still be in focus

To achieve a very deep depth of field; Use the smallest aperture available, the shortest focal length available and get very far away from your subject

Focal Length

The Focal length is the distance from the lens to it's focal point as shown in the below diagram;

ISO 200, Focal length 28mm, F9 @ 1/125

ISO 200, Focal length 135mm, F11 @ 1/160

To show the differences of shooting with different focal lengths I took the same shot using both a wide angle lens 28mm which gives a 180 degree view of the scene - a deeper depth of field and a telephoto lens 135mm which in term zooms in to a subject, giving a shallower depth of field.


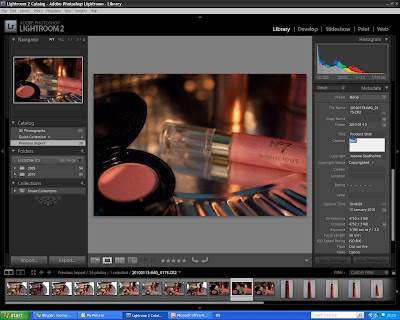
Drop Focus Technique

This technique is similar if not that the same principle as the Scheimpflug Principle. It is where there is just a line of focus within the final shot and beyond and below are completely out of focus hence the term, drop-focus technique.

ISO 800, Focal length 50mm, F2.8 @ 1/1600 sec

I used a macro 50mm lens and set it to the largest aperture. I positioned my camera very close to the object and just above then focussed on the logo in the centre of the lipstick.

Shutter Speeds

The length of time that the image sensor is exposed to light is controlled by the camera's shutter. This forms a barrier between the light coming into the camera and the sensor. The shutter opens only when the button at the top of the camera is pressed to take a photograph. The amount of time the shutter is open can be altered from a slow shutter speed of many seconds to a fast shutter speed of perhaps 1/8000 of a second.

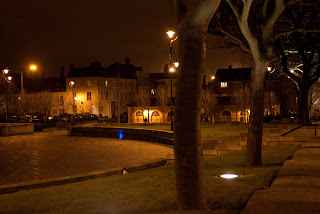
To show the difference between a slow and fast shutter speed I decided to take photographs of the traffic on our roads during the early evening rush hour. I set my tripod at the side of the road, knowing full well it would be needed having to take photographs with a long exposure (slow shutter speed) to ensure my photographs would have no camera shake!

Below is my original photograph taken with a shutter speed of 8 seconds. Due to the long exposure all movement can be seen via the light trials of the traffic.
ISO 400, Focal length 28mm, F22 @ 8 sec

As my original photograph did not show the true recording of the scene at that time, via Lightroom I decreased the amount of exposure and also cropped the image as shown below;


I also took another photograph from the same location however this time using a faster shutter speed of 1/100 second.

Below is my original photograph which was captured using a fast shutter speed, freezing the movement of the traffic.
ISO 400, Focal length 28mm, F4@ 1/100 sec

As my original photograph again did not show a true recording of the scene at that time, via Lightroom I increased the temperature of the white balance and also cropped the image as shown below;