Wednesday, October 28, 2009

Characteristics of Lighting *Research*

There are two main types of lighting within photography, natural and artificial, both of which have certain characteristics that will greatly affect the quality of our photographs. These characteristics are intensity, quality, direction, contrast, colour and unevenness.
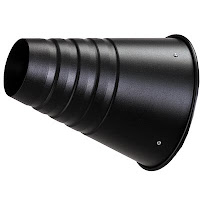
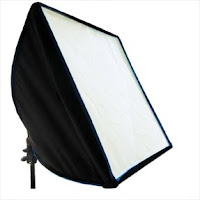
The intensity of the light is the quality or brightness of the light shining onto the subject. The quality of the light is seen by the type of shadows formed / cast on and around the subject.

Hard Shadow - sharp direct light source, i.e. the un-obscured sun or snoot


Soft Shadow - large source of light usually from above, i.e. the cloudy sky or a soft box


As a photographer I must measure the intensity of the light to determine the lighting ratio of the scene. The lighting ratio is the difference in intensity between the areas that receive the most light and the area that receives the least.

If a studio is lit with the use of bright lights then the ratio should be high where as if a studio is lit with dim lights then the ratio should be lower.

The lighting ratio affects the degree of contrast within a photograph; a high ratio should produce sharp images with strong contrasting light and dark tones where a low ratio should create softer images with a wider range of medium tones.

Looking in more detail into the differences in lighting ratio's within a studio environment I found this site to be very informative http://www.professionalphotography101.com/portrait_lighting/light_ratios.html

(TIP If taking colour photographs a high lighting ratio may make some colours appear either faint or excessively dark therefore it is best not to overpower the subject with light if a high quality and trueness of the colour is to be seen in the final image)

The colour of light can also vary according to its source although the human eye can't always detect this as the variations appear invisible to us. Ordinary light bulbs produce a reddish light and fluorescent light is basically blue-green. Variations in the colour of light produce a wide variety of effects in colour pictures, we can control these effects by using colour filters on the camera lens or using different colour settings on a DSLR, or colour film that is designed for different types of indoor lighting if using a SLR (film) camera.

Wednesday, October 21, 2009

Using available light & differences of lighting settings on a DSLR

On 14/10/09 Andrew Farrington set up various sets within the photography studio to demonstrate how natural light falls on a subject and to show the differences when taking a photograph using a different colour balance on a DSLR. Unfortunately to date oneself does not own a DSLR camera (as yet!) so I therefore teamed up with Gemma McAuley and below are the pictures obtained from the demonstration and notes taken from the lecture;

Set 1 - Lighting via a window on the subjects left hand side (the photographers right)
DSLR set at 1/125, F4.5 @ 400ISO DSLR set at 1/125, F5.6 @ 800ISO
White Balance Tungsten (Incandescent) Tungsten
Set 2 - Lighting via a window on the subjects left hand side (the photographers right) with a reflector on the subjects right (photographer's left hand side)
DSLR set at 1/125, F5.6 @ 800ISO

White Balance (Daylight)


Set 3 - Lighting via a window behind the subject using reflectors in front as shown below:
DSLR set at 1/125, F5.6 @ 800ISO
White Balance

Lighting via a window behind the subject (No reflectors)
DSLR set at 1/125, F5.6 @ 800ISO

White Balance

Set 4 - Lighting via a window 'Above' the subject
DSLR set at 1/125, F5.6 @ 800ISO

Camera pointing down Camera pointing straight
White Balance White Balance

Camera pointing down Camera pointing down
Shady Cloudy

Set 5 - Lighting using a 5500K Fluorescent daylight tube on the right hand side of the subject ( the photographers left)
DSLR set at 1/125, F5.6 @ 800ISO

Tungsten Shady Cloudy

Set 6 - Lighting using a 5500K Fluorescent daylight tube under the subjects face
DSLR set at 1/125, F5.6 @ 800ISO

Cloudy


Thursday, October 15, 2009

Studio Lighting

On Wednesday 07.10.09, Andrew Farrington welcomed his 2nd group of new Photographic Media Foundation Degree students into the studio on the 4th floor of the new and very impressive University Centre at Blackburn College. His role of the day being to demonstrate the differences in lighting techniques within a photographic studio.

Using a fellow student, Ryan as our model, we paired up into groups of three, to take pictures of him using different lighting set ups as shown below;

Set 1 - Using a soft box at 45 degree face height
DSLR set at 1/125, F5.6 @ 100ISO using white balance 5500
(TIP: Using a higher white balance will give a warmer effect on paler skin)


Set 2 - Using a soft box at 45 degree above face height
DSLR set at 1/125, F5.6 @ 100ISO using white balance 5500


Set 3 - Using a soft box at the side above face height with apposite reflector
DSLR set at 1/125, F5.6 @ 100ISO using white balance 5500


Set 4 - Using a soft box 45 degree behind and above face height with a sub tractor
DSLR set at 1/125, F5.6 @ 100ISO using white balance 5500
(TIP: This separates the subject from the background)


Set 5 - Using a soft box 45 degree behind and 45 degree in front above face height with a sub tractor
DSLR set at 1/125, F5.6 @ 100ISO using white balance 5500


Set 6 - Using a soft box in front and above face height with two side sub tractors
DSLR set at 1/125, F6.7 @ 100ISO using white balance 5500


Set 7 - Using a soft box above head (Top Light) in wrong position with two side
sub tractors
DSLR set at 1/125, F5.6 @ 100ISO using white balance 5500


Set 8 - Using a soft box above head (Top Light) in wrong position with two sub tractors and a under face reflector
DSLR set at 1/125, F5.6 @ 100ISO using white balance 5500


Set 9 - Using a soft box above head (Top Light) in wrong position with two sub tractors, a under face reflector and back light (Back Lit)
DSLR set at 1/125, F5.6 @ 100ISO using white balance 5500