I decided to take a photograph of an Orange and rather than just using the white curve opaque studio table for my background I used a sheet of blue transparent plastic. My choice of background colour to be blue . . . simply as orange and blue are complimentary colours. I had also been researching on the internet prior to my shoot where I came across an image on http://www.betterphoto.com/ which inspired me to use an Orange with a blue background for this part of the brief. As the image is protected by copyright I am unable to post this to my blogger as evidence for my inspiration however if you go to the website and type in friut in the search engine provided on the site, please view the image titled 'Orange and Blue'.
My 1st photograph is my Orange lit with 45 degree / 45 degree lighting. I positioned the honeycomb at a 45 degree angle from my camera and at a 45 degree angle from the subject / Orange which I was photographing.

You can see from my image that this type of lighting gives three dimensionality and a prominant shadow however the shadow would have been different dependant on the intensity of the light that I decided to use from the honeycomb. It also lights up the majority of the Orange which I felt was a success shooting the orange with a Canon 20D
My 2nd photograph is my Orange attempted to be lit with High Key lighting. Keeping the honeycomb positioned at a 45 / 45 degree angle this being the key light, I positioned a soft box on the other side of my subject and used reflector white boards to rebound the light sources back onto the Orange.

After researching on the internet, typing in lighting diagrams via google search engine, I came across this diagram which illustates how to set up a basic high key lighting set

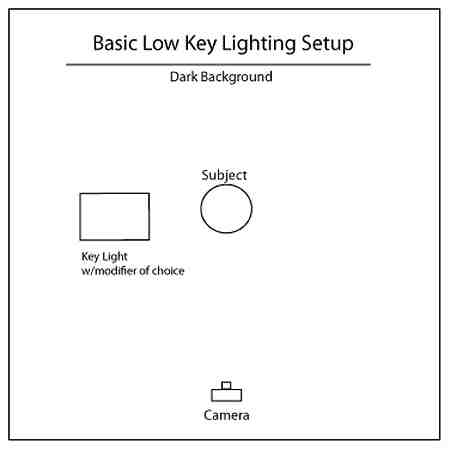
My 3rd photograph is my Orange lit with Low Key lighting. I positioned the honeycombed key light at a 45 degree angle at the side of the subject. I also changed my background using a darker blue cloth material as this would be needed to create a low key effect.

My 4th photograph is my Orange lit by back light. I placed a soft box behind the white curved opaque table and reverted back to my original background.

My 5th photograph is my Orange lit with Top light. I positioned the soft box directly above the orange but yet again decided to change the background to a black materal for best overall effect.

I like the symplicity of the top lit image. I feel that the gradients of light tones to darker tones through the Orange really make the photograph work well.
No comments:
Post a Comment